Tips & Methods For Lubricating Mechanical Keyboard Switches
You may lubricate your mechanical keyboard switches in many ways. Three levels—beginner, intermediate, and expert—are covered in this manual.
A well-tuned switch is undoubtedly one of the mechanical keyboard experience’s most gratifying elements. It’s on par with a finely adjusted stabilizer. Most people dislike lubricated switches. Either tangential or linear, there is more work to be done. Mechanical switch lubrication is a tedious operation. And is time-consuming
The monotony of lubricated switches can be overcome in many ways. You can work alone, in pairs, or in big groups. Also, you may employ a few techniques to enhance your lubrication system and hasten the lubrication transition.
What equipment do you need to lubricate your linear switches? Let’s find out how to maintain your linear switches, whether you’re a regular traveler or not. And how to benefit from the process of oil-based lubrication. I’ll talk about the way I lubricate linear switches. Plus, some advice I’ve picked up or seen applied by others.
Beginner Level
This level is appropriate for those who are just getting into mechanical keyboards. Individuals who are apprehensive about lubricating the switch, with little spare time or energy, as well as occasional keyboard makers, even those who detest lubricating their switch But, to keep the board in good shape, you might need to do some little steps.
Whatever You Choose
- A dual-purpose switch opener
- One set of fine tweezers
- Size-0 or size-00 brushes
- A linear switch’s optimal lubricant is the syringe.
option
- Oil bottle
- An additional size 0 brush for oil application.
- Stem support
Lubing Technique
The plan is to use the switch opener as a basis and lubricate each switch individually. The longest method is this one. Nonetheless, you can use it to lubricate the switch in tiny quantities as required. And shields the switch from outside impurities like pet hair or dust.
You will require lubrication, such as a little jar or a chunk of plastic. Lubricant brushes and a palette Make sure the lubrication is thoroughly blended. To prevent the separation of the oil. Furthermore, the lubricant you select is uniform in texture and has a smooth finish.
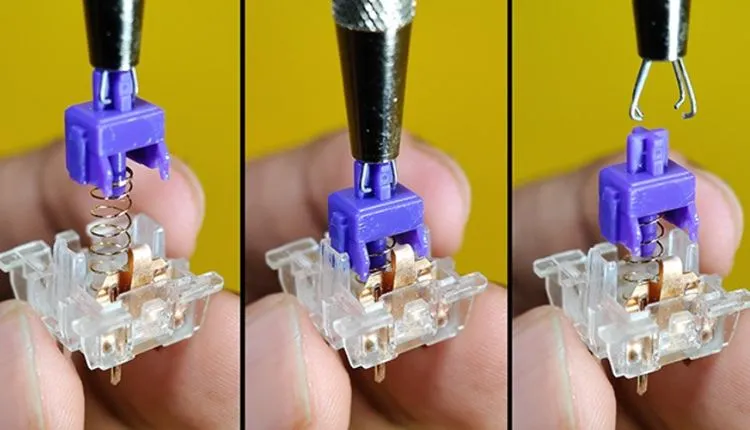
To turn on the switch and save the switch pieces in your bowl, take your switch opener. The Khail side is the huge 2-prong side, and the Cherry MX side is the 4-prong side. What breaks the sound? Your switch won’t get damaged. Your mechanical switch’s top and bottom housings are separated by the switch housing legs raised by the switch opener prongs. And Springs may bounce, as you may know!
Five components make up your switch: the top housing, stem, spring, and leaf, frequently divided into two. And below that, dwellings. The components of the top housing are lubricated.
When you notice a thin layer of white lubricant adhering to the bristles of the brush, dip it into the lubrication. The bottom housing’s rails on either side should be lubricated. The lubricant is then applied evenly using a brush. Just enough brushing of the leaves will reveal the copper’s sheen. Place your bottom housing on the switch opener after rotating around the center hole.
After you are certain there is no apparent whiteness on the brush but the brush is still saturated, dip the brush in the lubricant once more and brush out the excess. Use your fingers or tweezers to grasp the spring. While making keyboards, precision tweezers are an absolute necessity. To make the springs shine, lubricant should be applied to them. At the lower housing’s central hole, insert your spring.
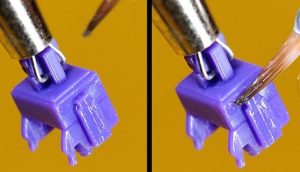
The brush is dipped in lubricant. A little lower than the base Dab all four sides of the stick while holding it at the top in the notched form. The paint slider A healthy, uniform layer of oil is visible on the front and back, as well as the front legs, without any white spots, similar to how you dealt with the holes in the bottom housing. Swirl the brush around the stem.
With the stem legs towards the copper leaf, insert your stem into the spring. The cutouts in the top and bottom housings should line up when the top housing is placed on top of the other switches. Lift the assembly and push the bottom and top housings simultaneously until you hear the switch click. simultaneously
Quick Tip: Avoid inserting the switch opener’s top housing into the bottom housing. Never worry about your sandwich switch going out!
Done. The linear mechanical switch has been oiled. Remember to check the activation and seal all of the legs!
Switches should routinely receive lubrication. To provide you with a satisfying typing experience. Because every switch you use feels the same, feel free to play around with various lubricant dosages. Instead, dip your lubricant many times. Less is more—Adding lubrication is simpler than removing too much of it.
Your first or tenth switch is incorrect. Yet you can adjust to it with time and practice.
Intermediate Level
Lubrication Technique
A lubrication station is a part of this technology. So that you can enhance the lubricating procedure, you can lubricate tiny or big switches at the majority of gas stations. You can lubricate 36 switches with the one offered by dustsilver.com.
Decide how many switches you want to lubricate all at once first. Cut them into individual boxes after opening them. I adore putting candles in glass jars.
Your mechanical keyboard switch parts should continue to be lubricated in the same order. Technical in terms of the stem and bottom box. You simplify the operation by lubricating all the batch components for each component of the mechanical switch at once.
While lubricating and installing the lubrication station, I like to hold the lower housing in my hand. I grease the rod with the Rod Handle as well. But you may utilize the station to help you by assembling all the dry mechanical switch parts before lubricating them.
If using film, insert a film strip into each lower slot after lubricating it. Be cautious around punctures and in general. The film’s glossy side is pointing downward on the device’s bottom.
Top Tip: To speed up your operation, employ the “bag” lubricating approach.
After lubricating your springs, all the axles in your kit need to be lubricated at this point, either on stage or with a fishing pole in hand.
Make all of your switch sandwiches after that, and rock on!
A little observation on switchable movies: Look into switches and experiment with some. If the movie has to be modified, you’ll know it. A thinner or thicker film thickness can be required. The thickest film you will get often ranges from 0.125mm to 0.30mm, depending on how much the housing vibrates. Materials differ. Flexible polymers often make up thin films.
Moreover, we add disposable foam to thicken the film. The film reduces the housing’s swaying. Being a moving item, some shaft wobbling is to be expected. It allows you to type thanks confidently to your steady hand from well-lubricated use.